As we have seen on previous posts (Launching an EMR cluster using Lambda functions to run PySpark scripts, part 1 and 2), EMR is a very popular big data platform, designed to simplify running Big Data frameworks such as Hadoop and Spark. Taking advantage of this platform allows us to scale up and down our compute capacity, leverage cheap spot instances and integrate seamlessly with our Data Lake. When we combine EMR with Lambdas, we can launch our clusters programmatically using serverless FaaS, and react to new data becoming available, or triggering on a cron schedule.
In this post, we propose to take this approach of using Lambdas to trigger EMR clusters one step further, and use AWS Step Functions to orchestrate our ML process. AWS Step Functions is a fully-managed service that makes it easy to build and run multi-step workflows. It allows us to define a series of steps that make up our workflow, and then Step Functions executes them in order. These steps can be run sequentially, in parallel, wait for previous stages to finish, or run conditionally if other workflows fail. The image below shows an example of a Step Function. It is a series of steps, where we can see a Start, Steps, Decisions, Alternatives, and an End. This is ideal for real-life workflows, where different decisions need to be made as the process progresses.

- An interesting advantage of using Step Functions for Machine Learning workflows (instead of a single workflow, for example) is that we can spin up independent clusters for each step. Different stages of a Machine Learning pipeline can have different memory requirements and processing power. Being able to easily spin up a cluster for each step allows us to use the right size of instances for each stage of the workflow, thus being more efficient with our time and spend.
Some other advantages to this approach are the seamless integration of StepFunctions with other services, such as Lambda, that allow us to build a complex workflow without having to orchestrate it manually, with easy out-of-the-box monitoring and error handling that StepFunctions provide – simplifying our retry logic and overall process monitoring.
So, hoping I have convinced you to try this new approach, let’s get hands on!
Spinning up our Step Function
The generation of the Step Functions can be done in two different ways: using the Step Functions visual editor, or leveraging CloudFormation. When I began this post, I wanted to use CloudFormation, but I ran into a CloudFormation limit (CloudFormation doesn’t allow us to create StepFunctions with a definition as long as I needed it to). This is why I will use the Step Functions visual editor, combined with Amazon States Language.
From the AWS website:
The Amazon States Language is a JSON-based, structured language used to define your state machine, a collection of states, that can do work (Task states), determine which states to transition to next (Choice states), stop an execution with an error (Fail states), and so on.
Our ML Workflow
We will define a workflow made up of 3 steps: data preprocessing, model training and model evaluation.
A set of examples, coded in Python using PySpark, and step by step to launch our first Step Function!
For this, we will need to create five things:
- An S3 bucket where you will store your scripts: preprocessing, training and evaluation, which contain the logic for each of those steps:
preprocessing_script.py
import argparse
# Import necessary libraries
from pyspark.sql import SparkSession
from pyspark.ml.feature import VectorAssembler
from pyspark.ml.classification import RandomForestClassifier
from pyspark.ml.evaluation import MulticlassClassificationEvaluator
if __name__ == "__main__":
    # Initialize Spark session
    spark = SparkSession.builder.appName("PreprocessingApplication").getOrCreate()
    parser  =  argparse.ArgumentParser(
        prog='LinearRegression',
        description='Randomly generates data and fits a linear regression model using Spark MLlib.'
    )
    parser.add_argument('--s3bucket', required=True)
    args = parser.parse_args()
    s3_path = args.s3bucket
    # Part 1: Generate Fake Data and Save to S3
    # Create a DataFrame with fake data
    fake_data = spark.createDataFrame([
        (1, 0.5, 1.2),
        (0, 1.0, 3.5),
        (1, 2.0, 0.8),
        # Add more rows as needed
    ], ["label", "feature1", "feature2"])
    # Perform necessary data transformations
    # (e.g., feature engineering, handling missing values, etc.)
    # ...
    # Prepare the data for model training
    # Assuming the features are in columns "feature1" and "feature2"
    assembler = VectorAssembler(inputCols=["feature1", "feature2"], outputCol="features")
    data = assembler.transform(fake_data)
    # Save the processed data to S3
    data.write.parquet("s3a://" + s3_path + "/path_to_processed_data.parquet")
    # Stop the Spark session
    spark.stop()
training_script.by
import argparse
# Import necessary libraries
from pyspark.sql import SparkSession
from pyspark.ml.feature import VectorAssembler
from pyspark.ml.classification import RandomForestClassifier
from pyspark.ml.evaluation import MulticlassClassificationEvaluator
if __name__ == "__main__":
    # Initialize Spark session
    spark = SparkSession.builder.appName("TrainingApplication").getOrCreate()
    parser = argparse.ArgumentParser(
        prog='LinearRegression',
        description='Randomly generates data and fits a linear regression model using Spark MLlib.'
    )
    parser.add_argument('--s3bucket', required=True)
    args = parser.parse_args()
    s3_path = args.s3bucket
    # Part 2: Read Data from S3, Model Training, and Save Model to S3
    # Read the processed data from S3
    processed_data = spark.read.parquet("s3a://" + s3_path + "/path_to_processed_data.parquet")
    # Split the data into training and test sets
    train_data, test_data = processed_data.randomSplit([0.7, 0.3], seed=42)
    # Initialize the classification model (e.g., RandomForestClassifier)
    classifier = RandomForestClassifier(labelCol="label", featuresCol="features")
    # Train the model on the training data
    model = classifier.fit(train_data)
    # Save the trained model to S3
    model.write().overwrite().save("s3a://" + s3_path + "/path_to_saved_model")

    # Stop the Spark session
    spark.stop()
evaluation_script.py
import argparse
# Import necessary libraries
from pyspark.sql import SparkSession
from pyspark.ml.feature import VectorAssembler
from pyspark.ml.classification import RandomForestClassifier, RandomForestClassificationModel
from pyspark.ml.evaluation import MulticlassClassificationEvaluator
if __name__ == "__main__":
    # Initialize Spark session
    spark = SparkSession.builder.appName("EvaluationApplication").getOrCreate()
    parser = argparse.ArgumentParser(
        prog='LinearRegression',
        description='Randomly generates data and fits a linear regression model using Spark MLlib.'
    )
    parser.add_argument('--s3bucket', required=True)
    args = parser.parse_args()
    s3_path = args.s3bucket
    # Part 3: Load Model from S3 and Perform Evaluation
    # Load the saved model from S3
    loaded_model = RandomForestClassificationModel.load("s3a://" + s3_path + "/path_to_saved_model")
    test_data = spark.read.parquet("s3a://" + s3_path + "/test_data.parquet")
    # Make predictions on the test data
    predictions = loaded_model.transform(test_data)
    # Evaluate the model's performance
    evaluator = MulticlassClassificationEvaluator(labelCol="label", predictionCol="prediction", metricName="accuracy")
    accuracy = evaluator.evaluate(predictions)
    # Print the evaluation result
    print("Accuracy:", accuracy)
    # Stop the Spark session
    spark.stop()
- An SNS topic where we’ll send our errors, if they happen
- A ServiceRole for EMR
– I used the EMR_DefaultRole, that AWS provides for us
- An IAM Role for our EMR clusters (I called it blog-emr-job-role)
– This will need the following trust policy:
{
    "Version": "2012-10-17",
    "Statement": [
        {
            "Effect": "Allow",
            "Principal": {
                "Service": "ec2.amazonaws.com"
            },
            "Action": "sts:AssumeRole"
        }
    ]
}
– And the following permissions:
{
    "Version": "2012-10-17",
    "Statement": [
        {
            "Effect": "Allow",
            "Resource": "*",
            "Action": [
                "cloudwatch:*",
                "ec2:Describe*",
                "s3:*"
            ]
        }
    ]
}
- And an IAM Role for our Step Function
– With the following trust policy:
{
    "Version": "2012-10-17",
    "Statement": [
        {
            "Effect": "Allow",
            "Principal": {
                "Service": "states.amazonaws.com"
            },
            "Action": "sts:AssumeRole"
        }
    ]
}
– And the following permissions:
{
    "Version": "2012-10-17",
    "Statement": [
        {
            "Action": [
                "states:Create*",
                "states:Describe*",
                "states:StartExecution",
                "elasticmapreduce:RunJobFlow",
                "elasticmapreduce:*",
                "states:List*",
                "iam:PassRole",
                “sns:*”
            ],
            "Resource": "*",
            "Effect": "Allow"
        }
    ]
}
Once we have all of these elements ready, we’ll need to replace them in our StepFunction definition, which I share below.
At a high level, we define three steps for each stage of our workflow: cluster creation, code execution and cluster termination. We also define a “catch-all” step that will alert via SNS if there is an error on any of the code execution steps. Something interesting to highlight is that StepFunctions have a predefined step type (createCluster, addStep and terminateCluster) for each of the steps we need, which reduces significantly the amount of code we need to write for our orchestration.:
{
  "Comment": "EMR Data Processing Workflow",
  "StartAt": "DataProcessing",
  "States": {
    "DataProcessing": {
      "Type": "Task",
      "Resource": "arn:aws:states:::elasticmapreduce:createCluster.sync",
      "Parameters": {
        "Name": "DataProcessingCluster",
        "ReleaseLabel": "emr-6.4.0",
        "LogUri": "s3://<YOUR_S3_BUCKET>/logs/",
        "Instances": {
          "InstanceFleets": [
            {
              "Name": "Master",
              "InstanceFleetType": "MASTER",
              "TargetOnDemandCapacity": 1,
              "InstanceTypeConfigs": [
                {
                  "InstanceType": "m5.xlarge"
                }
              ]
            },
            {
              "Name": "Core",
              "InstanceFleetType": "CORE",
              "TargetOnDemandCapacity": 1,
              "InstanceTypeConfigs": [
                {
                  "InstanceType": "m5.xlarge"
                }
              ]
            }
          ],
          "KeepJobFlowAliveWhenNoSteps": true,
          "TerminationProtected": false
        },
        "Applications": [
          {
            "Name": "Spark"
          }
        ],
        "ServiceRole": "arn:aws:iam::<YOUR_ACCOUNT_ID>:role/EMR_DefaultRole",
        "JobFlowRole": "arn:aws:iam::<YOUR_ACCOUNT_ID>:instance-profile/<YOUR_EMR_ROLE_(blog-emr-job-role)>",
        "VisibleToAllUsers": true
      },
      "ResultPath": "$.DataProcessingClusterResult",
      "Next": "DataProcessingStep"
    },
    "DataProcessingStep": {
      "Type": "Task",
      "Resource": "arn:aws:states:::elasticmapreduce:addStep.sync",
      "Parameters": {
        "ClusterId.$": "$.DataProcessingClusterResult.ClusterId",
        "Step": {
          "Name": "DataProcessingStep",
          "ActionOnFailure": "TERMINATE_CLUSTER",
          "HadoopJarStep": {
            "Jar": "command-runner.jar",
            "Args": [
              "spark-submit",
              "--deploy-mode",
              "cluster",
              "s3://<YOUR_SR_BUCKET>/preprocessing_script.py",
              "--s3bucket",
              "<YOUR_SR_BUCKET>"
            ]
          }
        }
      },
      "ResultPath": "$.DataProcessingStepResult",
      "Next": "Terminate_Pre_Processing_Cluster",
      "Catch": [
        {
          "ErrorEquals": [
            "States.ALL"
          ],
          "Next": "HandleErrors"
        }
      ]
    },
    "Terminate_Pre_Processing_Cluster": {
      "Type": "Task",
      "Resource": "arn:aws:states:::elasticmapreduce:terminateCluster.sync",
      "Parameters": {
        "ClusterId.$": "$.DataProcessingClusterResult.ClusterId"
      },
      "Next": "Training"
    },
    "Training": {
      "Type": "Task",
      "Resource": "arn:aws:states:::elasticmapreduce:createCluster.sync",
      "Parameters": {
        "Name": "TrainingCluster",
        "ReleaseLabel": "emr-6.4.0",
        "LogUri": "s3://<YOUR_SR_BUCKET>/logs/",
        "Instances": {
          "InstanceFleets": [
            {
              "Name": "Master",
              "InstanceFleetType": "MASTER",
              "TargetOnDemandCapacity": 1,
              "InstanceTypeConfigs": [
                {
                  "InstanceType": "m5.xlarge"
                }
              ]
            },
            {
              "Name": "Core",
              "InstanceFleetType": "CORE",
              "TargetOnDemandCapacity": 1,
              "InstanceTypeConfigs": [
                {
                  "InstanceType": "m5.xlarge"
                }
              ]
            }
          ],
          "KeepJobFlowAliveWhenNoSteps": true,
          "TerminationProtected": false
        },
        "Applications": [
          {
            "Name": "Spark"
          }
        ],
        "ServiceRole": "arn:aws:iam::<YOUR_ACCOUNT_ID>:role/EMR_DefaultRole",
        "JobFlowRole": "arn:aws:iam::<YOUR_ACCOUNT_ID>:instance-profile/<YOUR_EMR_ROLE-(blog-emr-job-role)>",
        "VisibleToAllUsers": true
      },
      "ResultPath": "$.TrainingClusterResult",
      "Next": "TrainingStep"
    },
    "TrainingStep": {
      "Type": "Task",
      "Resource": "arn:aws:states:::elasticmapreduce:addStep.sync",
      "Parameters": {
        "ClusterId.$": "$.TrainingClusterResult.ClusterId",
        "Step": {
          "Name": "TrainingStep",
          "ActionOnFailure": "TERMINATE_CLUSTER",
          "HadoopJarStep": {
            "Jar": "command-runner.jar",
            "Args": [
              "spark-submit",
              "--deploy-mode",
              "cluster",
              "s3://<YOUR_SR_BUCKET>/training_script.py",
              "--s3bucket",
              "<YOUR_SR_BUCKET>"
            ]
          }
        }
      },
      "ResultPath": "$.TrainingStepResult",
      "Next": "Terminate_Training_Cluster",
      "Catch": [
        {
          "ErrorEquals": [
            "States.ALL"
          ],
          "Next": "HandleErrors"
        }
      ]
    },
    "Terminate_Training_Cluster": {
      "Type": "Task",
      "Resource": "arn:aws:states:::elasticmapreduce:terminateCluster.sync",
      "Parameters": {
        "ClusterId.$": "$.TrainingClusterResult.ClusterId"
      },
      "Next": "Evaluation"
    },
    "Evaluation": {
      "Type": "Task",
      "Resource": "arn:aws:states:::elasticmapreduce:createCluster.sync",
      "Parameters": {
        "Name": "EvaluationCluster",
        "ReleaseLabel": "emr-6.4.0",
        "LogUri": "s3://<YOUR_SR_BUCKET>/logs/",
        "Instances": {
          "InstanceFleets": [
            {
              "Name": "Master",
              "InstanceFleetType": "MASTER",
              "TargetOnDemandCapacity": 1,
              "InstanceTypeConfigs": [
                {
                  "InstanceType": "m5.xlarge"
                }
              ]
            },
            {
              "Name": "Core",
              "InstanceFleetType": "CORE",
              "TargetOnDemandCapacity": 1,
              "InstanceTypeConfigs": [
                {
                  "InstanceType": "m5.xlarge"
                }
              ]
            }
          ],
          "KeepJobFlowAliveWhenNoSteps": true,
          "TerminationProtected": false
        },
        "Applications": [
          {
            "Name": "Spark"
          }
        ],
        "ServiceRole": "arn:aws:iam::<YOUR_ACCOUNT_ID>:role/EMR_DefaultRole",
        "JobFlowRole": "arn:aws:iam::<YOUR_ACCOUNT_ID>:instance-profile/<YOUR_EMR_ROLE_(blog-emr-job-role)>",
        "VisibleToAllUsers": true
      },
      "ResultPath": "$.EvaluationClusterResult",
      "Next": "EvaluationStep"
    },
    "EvaluationStep": {
      "Type": "Task",
      "Resource": "arn:aws:states:::elasticmapreduce:addStep.sync",
      "Parameters": {
        "ClusterId.$": "$.EvaluationClusterResult.ClusterId",
        "Step": {
          "Name": "EvaluationStep",
          "ActionOnFailure": "TERMINATE_CLUSTER",
          "HadoopJarStep": {
            "Jar": "command-runner.jar",
            "Args": [
              "spark-submit",
              "--deploy-mode",
              "cluster",
              "s3://<YOUR_SR_BUCKET>/evaluation_script.py",
              "--s3bucket",
              "<YOUR_SR_BUCKET>"
            ]
          }
        }
      },
      "Next": "Terminate_Evaluation_Cluster",
      "Catch": [
        {
          "ErrorEquals": [
            "States.ALL"
          ],
          "Next": "HandleErrors"
        }
      ]
    },
    "Terminate_Evaluation_Cluster": {
      "Type": "Task",
      "Resource": "arn:aws:states:::elasticmapreduce:terminateCluster.sync",
      "Parameters": {
        "ClusterId.$": "$.EvaluationClusterResult.ClusterId"
      },
      "End": true
    },
    "HandleErrors": {
      "Type": "Task",
      "Resource": "arn:aws:states:::sns:publish",
      "Parameters": {
        "TopicArn": "arn:aws:sns:us-east-1:<YOUR_ACCOUNT_ID>:YOUR_SNS_TOPIC",
        "Message": "An error occurred - The last EMR cluster was not terminated to allow further analysis of the error"
      },
      "End": true
    }
  }
}
Some interesting aspects we can see – for example:
"$.EvaluationClusterResult.ClusterId"
makes reference to the step above:
"ResultPath": "$.EvaluationClusterResult",
which allows us to create the cluster in one step, obtain its id and then use it in another step.
If we wanted to do more complex things, the idea is the same – we have to reference it in the result path or output path. More details about this here
Going back to our stack creation – once we’ve replaced the values, we can author a new Step Function. You can use this link or navigate to the StepFunctions console, select “Create State Machine” and select the option “Write your workflow in code”.
Both options will open the screen we see below, that includes a basic “Hello World” application. You will replace the code in the definition, and refresh the graph.
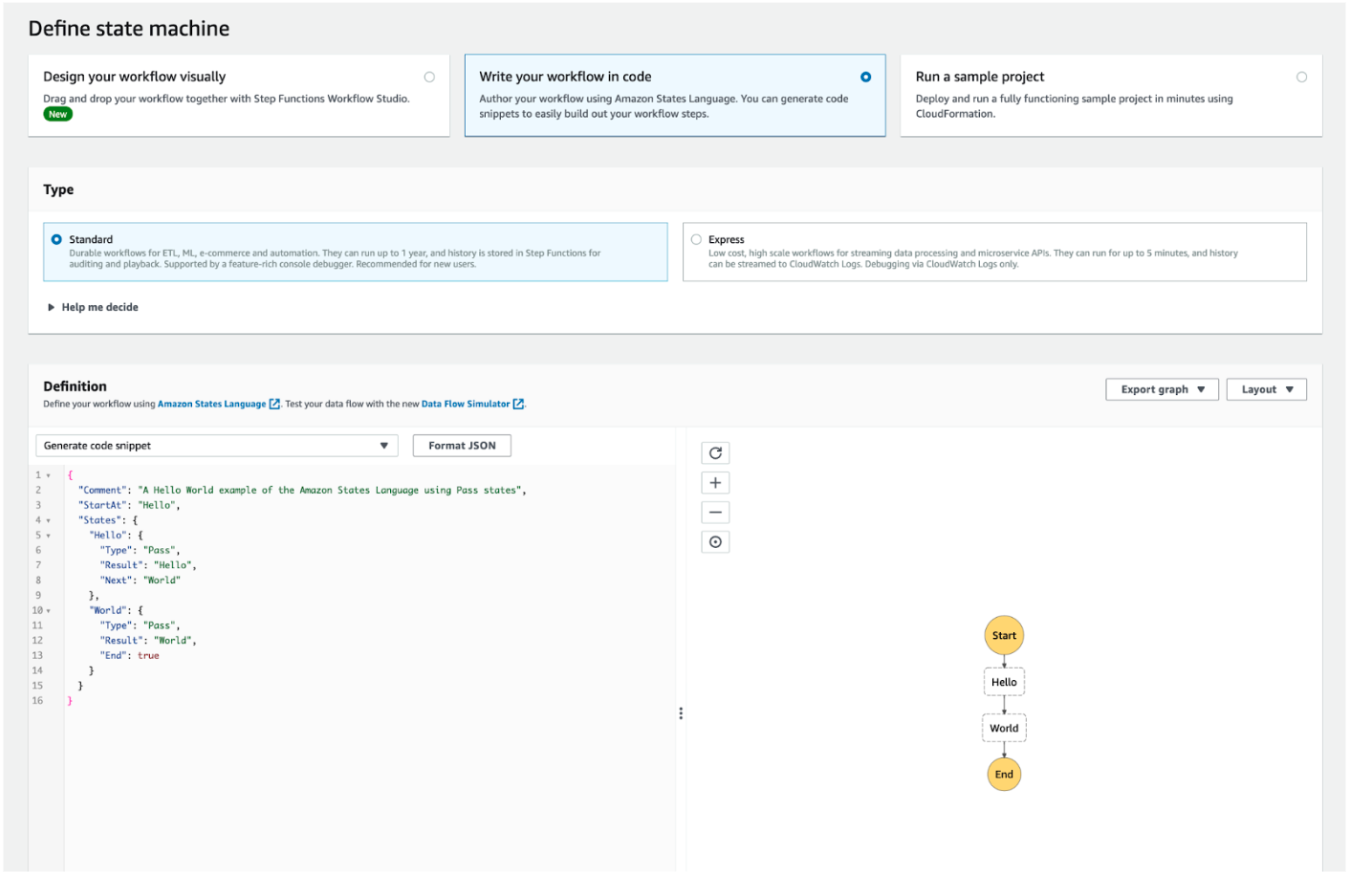
Once you’ve refreshed the graph, you should see the following:
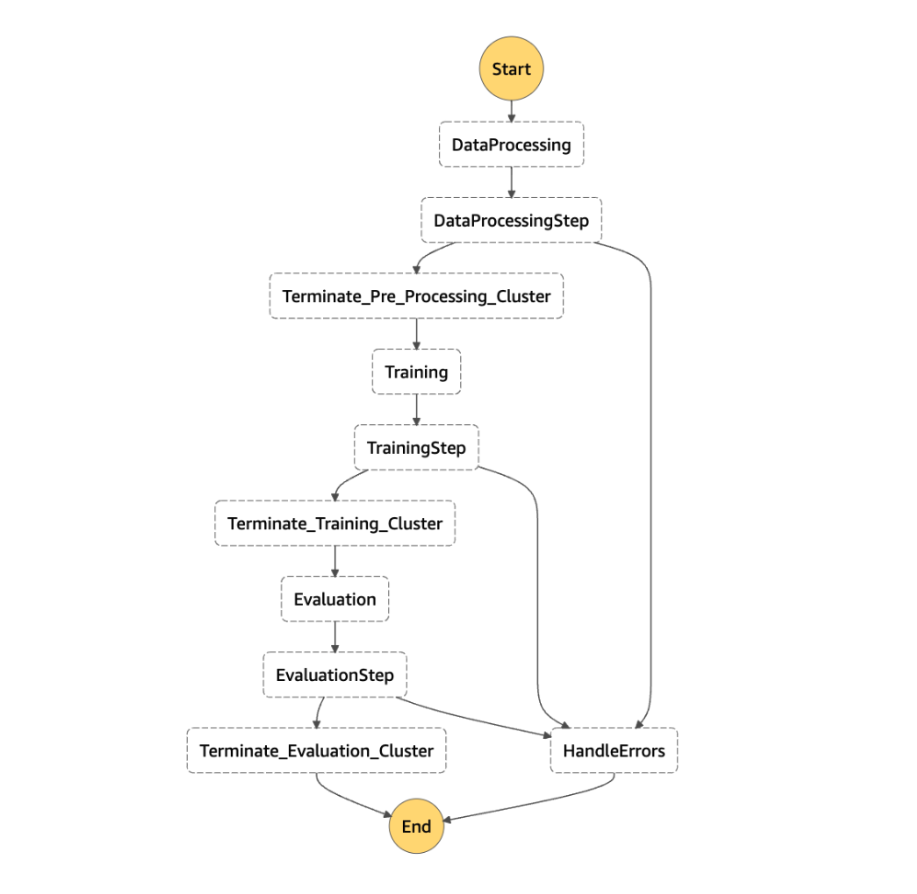
The next steps are to name your Step Function, and assign it a role (the one we had created above would be ideal) – and create it with the button “Create State Machine”. Allow some minutes for it to be completed, and you’re ready to go!
You’ll find a button to “Start Execution” – which will trigger your steps. Once it starts executing, the flowchart will update with the different statuses – blue for steps in progress, green for successful steps, orange for caught errors, and red for unexpected errors.
It’s important to highlight that the EMR clusters will be available via the usual EMR console – which simplifies the process monitoring for people who are familiar with it. The fact that it was triggered via StepFunctions is completely transparent to the end users.
Going back to our Step Function and error handling, in the image below we can see two different errors. The step “TrainingStep” caught an error (which is part of the expected workflow), but the step “HandleErrors” failed. This allows us to easily find what failed and where.

On this other image, we can see that the workflow failed, but the error handling succeeded.
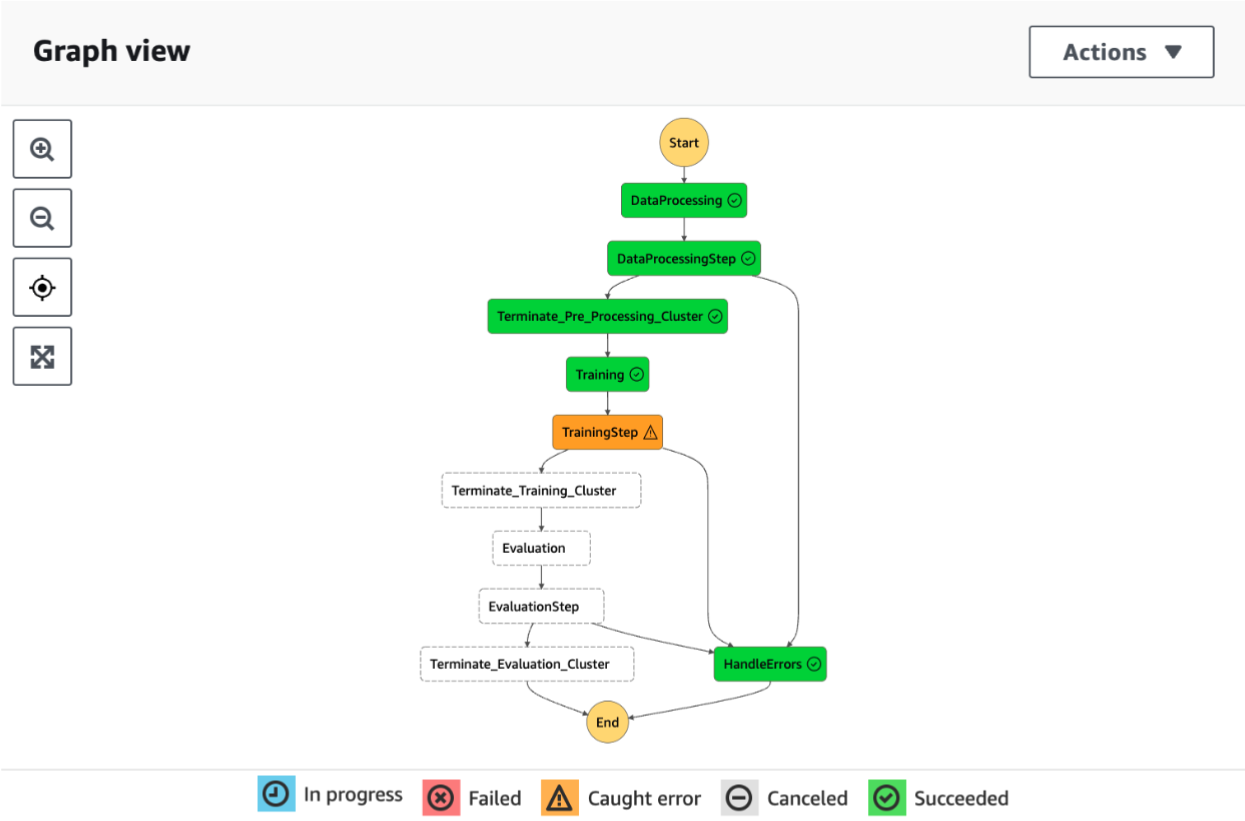
This is important to highlight because caught errors are part of our workflow and we have prepared for them (e.g. with alerting). Unexpected errors might leave our work in an incomplete state that requires manual intervention.
Conclusions and next steps
Well, thanks for making it this far and I hope you’re excited to try this out!
We can see that spinning up a set of EMR clusters is quite easy with Step Functions, and it allows us to leverage the power or EMR in a simple and straightforward way. As a final recommendation, I’d like to highlight some of the best practices for using these two services together:
- Separate cluster creation and job execution
- Parametrize your steps
- Handle failure scenarios gracefully
- Include log destinations
- Optimize cluster sizing
- Be careful with security and access control
With all of this in mind, onwards to your own experiments! And don’t hesitate to write with any issues or questions – happy to help!
Happy coding! 🙂
Stay ahead of the curve on the latest trends and insights in big data, machine learning and artificial intelligence. Don’t miss out and subscribe to our newsletter!












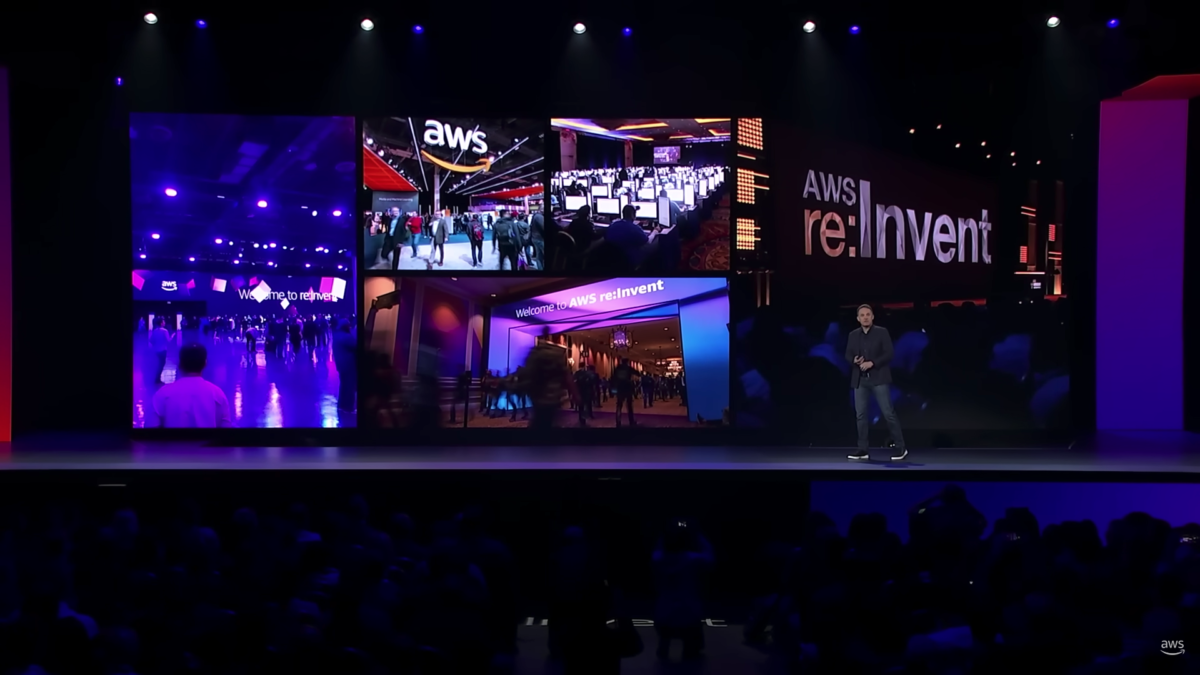
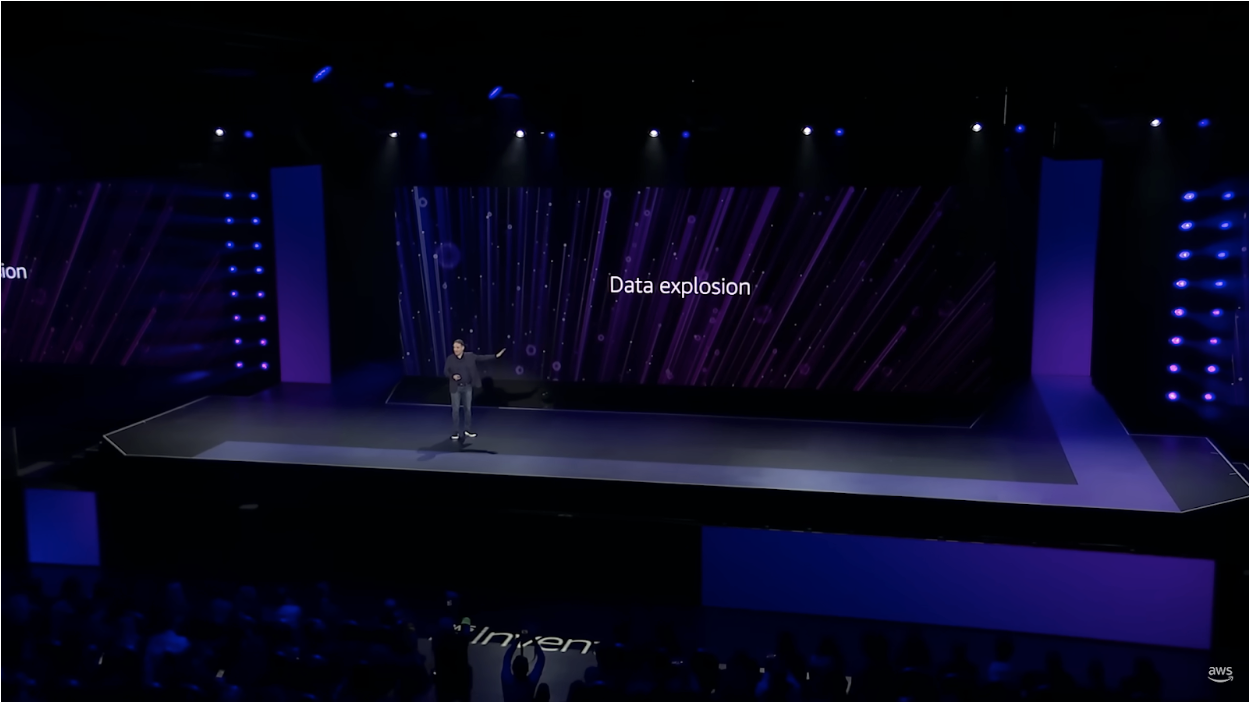 First things first, and something we already knew at Montevideo Labs: Data is the future, but also the present! It was clearly a central part of Adam Selipsky’s Keynote, where he made some impressive announcements. Data is everywhere, and there are a wide variety of sources, which keep growing! AWS is looking to bring a solution through Data Zone – a new data management service that allows us to view and manage data across different sources. Furthermore, Data Zone will allow us to centrally govern data access – a frequent headache for modern organizations with a myriad of data sources and data consumers that only keep growing. The diagram below shows the different components it includes, and how they integrate with different tools. So, we’ll be looking forward to start integrating Data Zone on our upcoming projects and leveraging its power!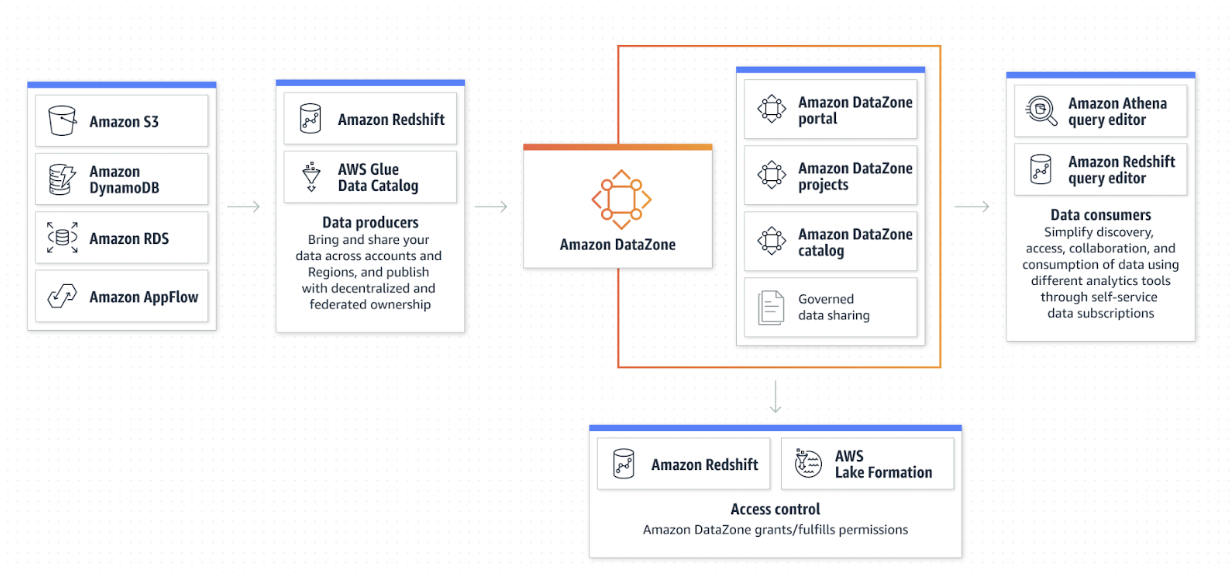
 Something we are all experiencing – AI is becoming more and more ubiquitous. Entire industries are being disrupted by AI – even sports and health. I attended a session where a speaker used IoT technology to monitor his blood sugar, and we have clients that are taking the world of sports by storm. We will continue to see how AI affects our day-to-day life. As developers, it’s also interesting how the costs for using ML continue to drop. AWS released EMR serverless, which enables us developers to focus on our algorithms and simplifies the managing of clusters, while also keeping costs low. Another aspect that helps us are the large number of “pre built” and “low-code” solutions presented, aimed at reducing toil and letting us developers focus on adding business value. SageMaker Data Wrangler and AWS Comprehend are some of the ones we have played with, and we believe we’re just scratching the surface.